An Easy Way to Answer SWL Cards Received
By Jim Pickett
– K5LAD
NOTE: This page is still under construction. If Google snuck you in here, check back later for the full corrected version.
Contents:
To enter SWL information
and link to your ham QSO
To Print
Setting up LogPrint
Custom Label Design 1
Custom Label Design 2
Custom Label Design 3
keywords: Shortwave Listener, SWL, Short wave listener, Logger32, SWL confirmation
I have always found it to be somewhat difficult, or at
least awkward, to answer confirmation cards received from SWL stations. Many hams, particularly in foreign countries,
developed much of their interest in radio, by spending many hours in ShortWave Listening
to hams. I don't know if it is still true,
but at one time, before a person in some countries could get an amateur radio license,
they must have spent a certain time period in SWLing.
To enter the next licensing step they had to have a particular number of
confirmation cards from hams to prove their SWL experiences. For that reason, I always wanted to find a
convenient way to answer the SWL cards I received but this never seemed to be an easy
procedure for me, however. When computerized
logging programs came along, they never seemed to have a built-in facility to confirm
these received contacts like we could with the standard ham QSOs.
Even now, particularly if you receive periodic shipments of QSL cards from your district Incoming QSL Bureaus, you will often find SWL cards mixed in with the QSL cards from foreign stations who were listening to your DX contacts and wishing they could be a part of the fun. Until Bob Furzer - K4CY added the SWL confirmation feature to Logger32, I must confess that I failed to confirm some of the SWL cards I had previously received. Fortunately, however, this SWL confirmation feature was added to Logger32 with version 3.36.0 in January of 2012. Not only was it an important addition but very convenient to use. SWL confirmations, now, are much easier to accomplish. If you follow these instructions, I'm sure the large population of avid SWLers around the globe will be much happier.
To Enter SWL information and link to your ham
QSO:
Click on the rectangular button labeled "Reply to SWL
report" and it will open an additional area on the Quick QSL window, down at the
bottom. In the newly-displayed part is a
rectangular entry window labeled "Enter SWL number and click Send." The SWL card will have the sender's SWL call
number and it is entered in the window. You can then click on the Send button. At this point, if it is the first SWL card ever
entered into your Logger32 log, it will open an ADIF file in Logger32's folder, which is
called, "[your call]32_SWL_dump_file."
In my case my file is named, “K5LAD32_SWL_dump_file." From this point on I will use the filename “[your
call]32_SWL_dump_file”, but you should mentally insert whatever call you’ll
see on your own computer. If there is already
a previously-created .adi file, the just entered SWL confirmation information will be
appended to this file at the top. When this
file is eventually used to print your SWL confirmation cards, you should either delete
this “[your call]32_SWL_dump_file" or store it in a different archival
folder. Doing this will allow a new file to
be opened when you get the next unverified SWL card and you won't continue to send SWL
confirmations to your earlier group sent.
Logger32 will handle all of the necessary actions to create
and add to your file used to print confirmation cards to the SWL cards you receive. Note that if you look at the regular exported
ADIF file for that particular contact, you will NOT find any reference to the SWL card
being received, marked, or confirmed. The
only evidence that you have confirmed the SWL card receipt or confirmation in the Logger32
files, will be in that "[your call]32_SWL_dump_file." This means, if you choose to maintain a record of
the ones you have confirmed, you should archive the dump files in a location of your
choosing.
To Print:
|
|
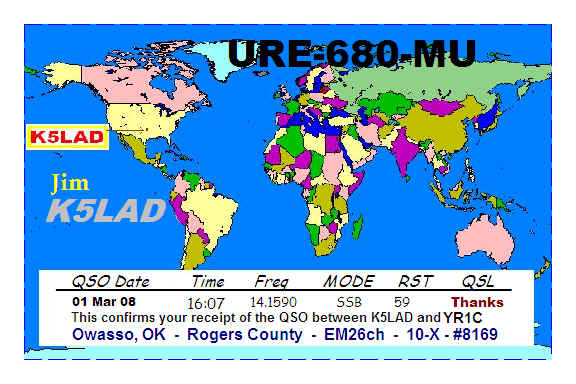
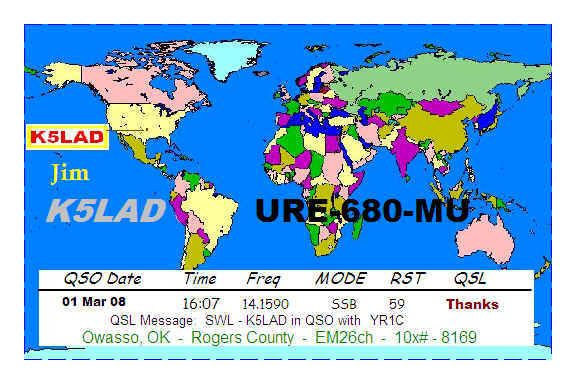
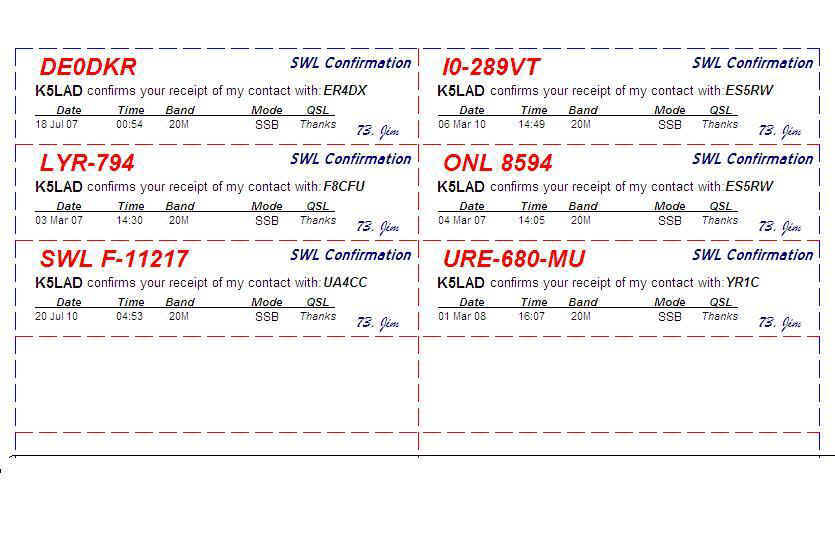
I currently print my SWL confirmations as complete
multi-colored cards with information imprinted on them in the proper places. |
|
|
K5LAD SWL Card
#1 |
|
|
|
K5LAD
SWL Card #0 |
I use LogPrint to accomplish this task and it works quite
well. LogPrint is an external, stand-alone
program used to take the ADIF file created by Logger32 (or any logging program capable of
exporting a correct ADIF file) and print the information in the proper places as set up by
the user. LogPrint can print either various
styles of stick-on labels or can print the entire card.
LogPrint is available at the Logger32 website in the Utilities section. The URL is http://www.logger32.net/utilities.html#.Ug0hYtJDl8E Please
note that LogPrint, like Logger32, is a FREE program. Once you have downloaded the program it is highly
recommended that you spend a bit of time reading the Helpfile that is included with the
program. This excellent document, written by
Geoff Anderson – G3NPA, will answer many of your questions, even before you think to
ask them.
Since LogPrint has allowances for only three setup
configurations, I like to use a separate version for my own SWL creation facility. I place copies of the LogPrint that I use for ham
QSL card labels and ham QSL cards in one folder of my Logger32 bundle. This ham LogPrint folder contains a copy of the
program, the Logprint.ini file with the configurations for:
(1.) single QSO labels printed on 1" x 4" label
stock,
(2.) multi-QSO labels printed on 2" x 4" label
stock, and
(3.) a whole QSL card with imprinted data for a single QSO
printed on 3 1/2" x 5 1/2" card stock. There
are also some picture files required so they also go into this folder.  The shortcut icon placed on the Windows Desktop
identifies it as the Ham QSL version. My
current version of LogPrint is v.3.1.2 but if a later version comes available, I will
obviously switch to the latest and greatest version and change the reference numbers on
the shortcut.
The shortcut icon placed on the Windows Desktop
identifies it as the Ham QSL version. My
current version of LogPrint is v.3.1.2 but if a later version comes available, I will
obviously switch to the latest and greatest version and change the reference numbers on
the shortcut.
I have a different folder for my LogPrint SWL
printing program. It also contains a copy of
the LogPrint program, a different Logprint.ini with 3 different configurations for:
(1.) a whole SWL confirmation card with imprinted data for
a single QSO printed on 3 1/2" x 5 1/2" card stock and information to print with
one setup,
(2.) single QSO labels printed on 1" x 4" label
stock, and
(3.) a whole SWL confirmation card with imprinted data for
a single QSO printed on 3 1/2" x 5 1/2" card stock and the information to print
but with a different setup.
These various SWL card setups can be on different
background pictures, different printing positions, or different type font styles and/or
colors.  The shortcut icon
placed on the Windows Desktop identifies it as the SWL QSL version.
The shortcut icon
placed on the Windows Desktop identifies it as the SWL QSL version.
The picture for the background can be whatever the user
wants for their card. It could be a picture
of their shack, their family, or their antenna farm.
It could be a map of the globe, the country, their geographical entity, or a
combination of any or all of these.
Once the background picture is determined, it can be
combined into a regular digital .jpg or .bmp file and saved as one picture file, keeping
in mind that the final picture will cover a rectangular space measuring 3 1/2" by 5
1/2". Keep an extra, unspoiled copy of
this picture file since the next step involves making some changes and the user may need
to retrace their steps back to an earlier, unspoiled version.
I like to use the graphics program called "Paint"
since it is easy to use, and should be available to anyone with an old or new copy of
Microsoft Windows. MS Paint has been included
in the Accessories section of Windows Startup Menu for many years. Open the Paint program and import a copy of your
backdrop picture. It is possible to print
your ADIF data across the colored face of the card but I find it more readable to clear a
rectangular space in the picture and have LogPrint place the text on a white surface. A space is easily cleared by using the
"Select" tool at the top, right side of the list.
Click on the tool, place your left mouse pointer at the upper left corner of
where you want the white box to begin, and while holding the left button, move the mouse
down and to the right to create the exact sized box you wanted and let go of the mouse
button. At this point you should have a
dashed box outlining where you want to remove parts of the colored picture. Is it not exactly where you want it? No problem, just tap the ESC button and try again.
If the dashed box is where you want it, tap the keyboard's
Delete key and the dashed box disappears along with any colors or writing within that
space. Volla!
Now you have a target area to place your confirmation text and it will be easily
readable against a white background. Ah, but
wait........... After deleting the picture
area, did you decide that it should be larger, smaller, or a different shape? No problem, just press the Ctrl and Z keys
together and the last thing you did in MS Paint will go back a single step. Ah, that life had a Ctrl/Z feature....... but,
alas..... If, perhaps you do get further into
this activity and wish to go back to the original and start again, that's why you saved an
extra copy of the original file as suggested above. Just
call your previous activities, a “practice session.”
If you want to identify something on your background
picture, now is the time to do that. For
instance, you might want to identify members of your family in the picture, or the pieces
of equipment in your shack picture, or maybe to point out the barely "seeable"
stealth antenna in the antenna farm picture. You
might even want to note "My QTH" on a background map picture. Whatever you place on your background picture,
currently loaded in the MS Paint program, will show up in EVERY card printed. Only the data will be different for each card. To identify things in the pictures you can use
lines (the Line tool), and or write it out (the Text tool).
Both lines and text can be made in various sizes and colors. When you're in the Text mode there are several
fonts available as well as bolding and italics. Just
remember, when you had to say, "Ooops" because you added something you did not
want on the final version, you can always remove the previous step with a Ctrl/Z.
Once you have your background picture like you want it, be
sure to save the file. Place that file in the
LogPrint SWL folder so you can locate it when you're ready to print the card. If you are finished designing background pictures
and getting them ready to combine with SWL card text, you can close the MS Paint program. As old as MS Paint is, it still remains an easily
used and versatile graphics program and bears keeping it in one's tool caddy. Personally, I keep a Paint shortcut on my Desktop
at all times.
Setting up LogPrint:
LogPrint likes to see where it will be printing so I would
first set up a printer in the configuration. Click
on File and Select Printer. The program
should be able to identify any or all the printers you have attached to your computer. If you're on a network, it should display a list
of all the printers you might have available on your network. I personally like to have the option of printing
my labels or cards to a .pdf file rather than to send it directly to a printer. Printers, particularly inkjet printers, use up
valuable and expensive ink as you experiment so printing to a .pdf file is quite a $$$
saver. I use a program called PDF995
that is inexpensive, easily available, and works well.
I wrote about it in a previous article and you can read that information at: http://www.hayseed.net/~jpk5lad/LogPrint%20Labels/2013%20Label%20Update/LogPrint%20Update2.htm It's listed as Note#1 under the
"NOTES:" section. In addition to
being more inexpensive to print to a .pdf file, I find that it gives me more control of
the final printing so I often print my output to the file and do my final printing job
from that .pdf file.
Next, you need to identify the ADIF file which contains your "to print" data. In this case it will be called, "[your call]32_SWL_dump_file" and will initially be located in your Logger32 folder. This will probably be in C:\Logger32\ or if you installed the program prior to Windows Vista, or recently to one of the older Windows versions, it might be in C:\ProgramFiles\Logger32\. I like to move my dump file to the LogPrint SWL folder also but if you prefer to leave it in the Logger32 folder, it will continue to increase in size as new SWL cards come in and are entered. Since I want to collect, print, then start again a new file for the next printing, I prefer to move my dump file out at this time.
Click on the button labeled "Label Input File" and
choose your dump file, wherever it might be currently located. Since I prefer to keep mine in my LogPrint SWL
folder as mentioned above, that's where I would find mine.
LogPrint will display the path to this file in the rectangular box below the
"Label Input File" button. NOTE: Sharp-eyed readers will note that my picture in the example to the right adds the word "TEST" to the file name. I did this for the purpose of this article where I had removed all the entries in the "dump.adi" file except a single entry, just for the ease of creating examples for this article. Your file will not be labeled this way but will be as previously noted.
|
|
|
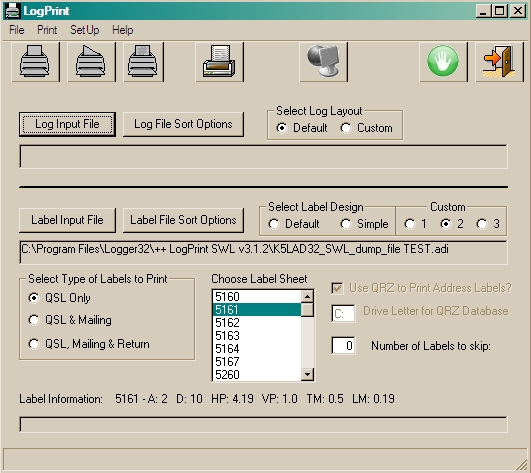
Click on "Custom Label Sheet setup" to set up the
type of stock to be used in the printing activity. LogPrint
already has the dimensions for many commercially available labels sold by Avery. The box in the center of the screen, under the
“Choose Label Sheet” title shows the Avery product number and when a number is
highlighted the line “Label Information:” tells the values for that particular
label. For instance, the Avery label number
5161 describes a label sheet ready to feed into a standard printer (8 1/2” x
11”) that has labels 2 across and 10 down. These
labels are individually die cut to be 1” high and 4.19” wide and will easily
peel off the carrier sheet when printing is complete.
It has a left margin of 0.19” and a top margin of 0.5” where
nothing should be printed.
There is no setup configuration for a QSL card so the user must define their own in one of the Custom Label Sheet entries. Since two of the configurations in this example use the same size stock, only one Custom Label needs to be defined. We will used Custom Label 1 for both cards in configuration spots #1 and #3. These cards are to be 3 1/2” by 5 1/2” so we’ll enter 5.5 under Horizontal Pitch and 3.5 under Vertical Pitch.
Also the Top Margin and Left Margin need to be set since
most inkjet printers will not print from the very top or bottom edge or from the leftmost
to rightmost edges. This may vary from
printer to printer but most printers allocate about a quarter of an inch around any sheet
of stock and will refuse to print on any of those border edges. If you attempt to have your SWL card begin
printing from the exact upper left corner of the paper stock, hoping you could only make
two cuts to extract your card, you’ll probably be disappointed. To print a card with the exact dimensions you set
up (which is probably 3 �” x 5 �”) you must add a value in the Top Margin to
move it down and the Left Margin to move it over. The
cut the card out, and free it from the larger piece used to print, it will take four cuts. Again, this may take some experimenting with your
own printer but a good value to start with is �”.
I started with .3 in each box and ended up with .25.
It would be convenient to print QSL cards 2 across the
shorter dimension and 2 down the longer dimension. That
way we could print 4 cards on a standard 8 1/2” x 11” sheet of card stock, and
then cut the 4 cards apart with an eXacto knife and have very little trim to discard. Unfortunately, however, LogPrint does not have a
feature to print cards this way so I find it easiest to just print 1 card per sheet of
stock at a time. Any user who likes to
experiment with LogPrint could probably set up their configuration to print 2 and possibly
even 3 cards on a single sheet of stock by printing the longer card length across the
page. 3 cards on a page becomes even trickier
since many printers automatically allocate some space at the top and bottom of the page
for their own use so the user would need to do some fancy footwork to print three 3
1/2” high cards on a single page. Even
if LogPrint allowed that feature, two 5 �” cards printed the long way would equal
11” which is the typical size of the paper stock.
We mentioned in the discussion in the previous paragraph about printer borders,
that would run out this printer method. As for me, I was happy to set up my
configuration to print a single card on a single sheet of stock.
Once the Custom Label Sheet is set up, click on
“Associate Label Sheet” and click on the line “Reset Association” This lets the program know that when you’re
on Configuration #1 it should use Custom Label Sheet entry “Custom 1.” Do the association activity with each
configuration setup.
xxxxxxxxxxxxxxxxxxxxxxxxxxxxxx
Any user who likes to experiment with LogPrint could
probably set up their configuration to print 2 and possibly even 3 cards on a single sheet
of stock by printing the longer card length across the page. 3 cards on a page becomes even trickier since
many printers automatically allocate some space at the top and bottom of the page for
their own use so the user would need to do some fancy footwork to print three 3 �”
high cards on a single page. As for me, I was
happy to set up my configuration to print a single card on a single sheet of stock.
You might note that you do not need to allocate a border as
above when you’re printing the commercial Avery labels. When you choose an Avery label product number,
such as #5161 for the 1” x 4” labels, it automatically makes allowances for the
top and side borders. It knows where the cuts
have been made in the sheet and knows where the labels are to be printed.
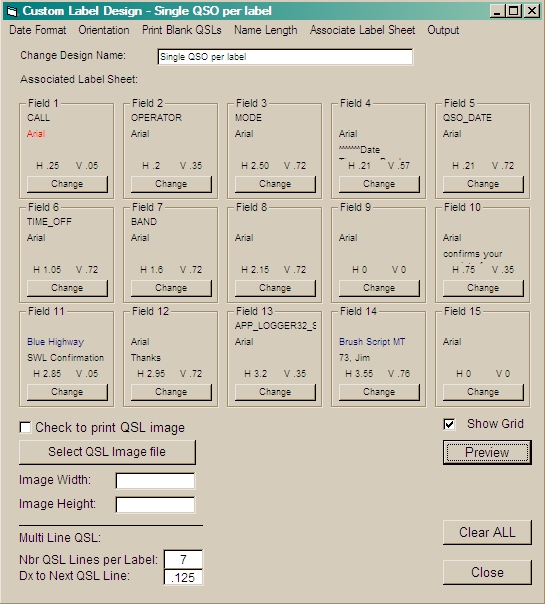
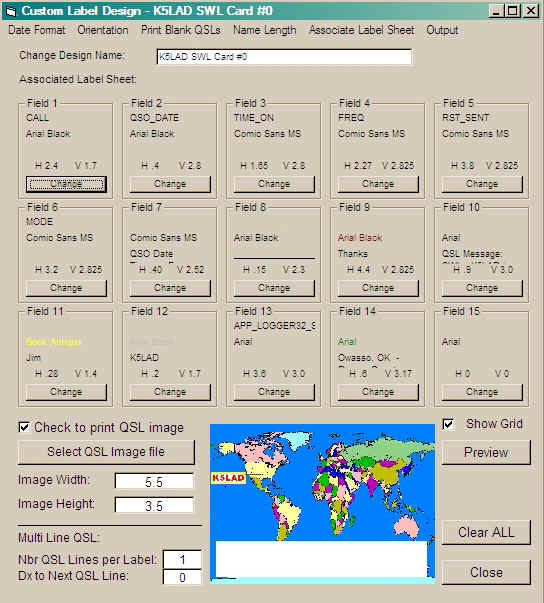
The next, and probably the most important step in the setup, is the
"Custom Label Design" sub-window, reached by clicking on SetUP on the LogPrint
menu bar. Choose the one you want to work on
(1, 2, or 3) and put a descriptive name in the box labeled "Change Design Name." Once you have filled in the name and closed that
sub-window, the next time you see the window showing "Change Design Name," it
will also display the name you have provided, for example -- "Change Design Name -
K5LAD Custom SWL Card #1"
The procedure for setting up the LogPrint configurations
has been written up in detail on my website in an article titled "LogPrint Multiple
Label Suggestions" found at: http://www.hayseed.net/~jpk5lad/LogPrint%20Labels/LogPrint.htm
and another article titled "Updated Information on
Printing With LogPrint" found at: http://www.hayseed.net/~jpk5lad/LogPrint%20Labels/2013%20Label%20Update/LogPrint%20Update2.htm
I will show the configurations I have used in this article
but if you want to study how LogPrint works with the configurations in detail, please see
the above referenced articles.
I have made available a copy of the Logprint.ini file that
I am currently using for my configurations. LogPrint
is such a versatile program and everybody has their own ideas for what they would like
their finished products to look like. Perhaps
sharing my file is somewhat akin to sharing a toothbrush but it might give you an idea of
a starting point for your own. It also bears
reminding both the novice and veteran LogPrint user to keep a correctly working
Logprint.ini file in a safe place somewhere, perhaps on that old thumb drive that you
originally thought held loads of data but that 64Meg thumb drive is pretty puny today.
It is also worth reminding the user that a previously
mentioned article on LogPrint has a nice collection of what some of the errors mean, which
sometimes rear their ugly head. This is
located near to end of the article at: http://www.hayseed.net/~jpk5lad/LogPrint%20Labels/2013%20Label%20Update/LogPrint%20Update2.htm
Custom Label Design - 1 The term in CAPS under the Field name and number is taken from the ADIF file with that same name, which was created by Logger32. The only variation is shown in Field 13 where it uses a field only common to Logger32 called APP_LOGGER32_STATION_IN_QSO. This holds the call of the station the SWLer heard you talking to. All others should be self-explanatory and any confusion can probably be cleared by reading my article at: http://www.hayseed.net/~jpk5lad/LogPrint%20Labels/LogPrint.htm
|
|
|
|
|

| Custom Label Design - 2 The term in CAPS under the Field name and number is taken from the ADIF file with that same name, which was created by Logger32. The only variation is shown in Field 13 where it uses a field only common to Logger32 called APP_LOGGER32_STATION_IN_QSO. This holds the call of the station the SWLer heard you talking to. All others should be self-explanatory and any confusion can probably be cleared by reading my article at: http://www.hayseed.net/~jpk5lad/LogPrint%20Labels/LogPrint.htm |
|
|
|
The examples of labels printed are on Avery #5161 stock. These labels could be stuck on existing QSL cards for a rapid sending confirmation without the need to set up the more-difficult card-printing feature. |
|
|
|
| Custom Label Design - 3 The term in CAPS under the Field name and number is taken from the ADIF file with that same name, which was created by Logger32. The only variation is shown in Field 13 where it uses a field only common to Logger32 called APP_LOGGER32_STATION_IN_QSO. This holds the call of the station the SWLer heard you talking to. All others should be self-explanatory and any confusion can probably be cleared by reading my article at: http://www.hayseed.net/~jpk5lad/LogPrint%20Labels/LogPrint.htm
|
|
|
|
Once the user has prepared their background picture for
their SWL confirmation cards, the rest of the activity is not as difficult. Somewhat like free-fall parachuting, it’s
that first step that’s the hardest.
My thanks to Jim – W5IFP for his ideas in creating my
original card. Perhaps some day I’ll
become more creative and won’t need to stea………… borrow my ideas
from others.
Note: Both the Logger32 complete logging program and the LogPrint printing program are available for FREE downloading from the website at:
Logger32 can be found by choosing Program Files and LogPrint is under the choice Support Files.
Written August 17, 2013 Updated 08/20/13 03:23 PM