Updated Information on Printing With LogPrint
Contents:
Printing single QSO labels
Printing multiple QSOs
labels
Printing full QSL card with
QSO data
Glossary of LogPrint errors
and their probable solutions
Introduction:
The purpose of the LogPrint software is to provide Logger32 with a set of basic print routines for the hard copy printing of the log and the making of QSL labels. It also allows the user to create their own QSL card as a blank or one filled in by the computer as the card prints. I am not the author of LogPrint nor did I write the original Helpfile for it. The framework or original concept for LogPrint was developed by J.B. Edmonds – N4NQY and later modified with the program actually being written by Charles Sutton - W1MCP. An excellent Helpfile document was written by Geoff Anderson - G3NPA and is included in the download of the LogPrint program available under the Utility section of http://www.logger32.net/ under the sub-heading “LogPrint & QSO Map by W1MCP”. The Logger32.net website has been recently redesigned and as this article is being written, LogPrint can be found at: http://www.logger32.net/utilities.html#.UUoGKRe_N8E
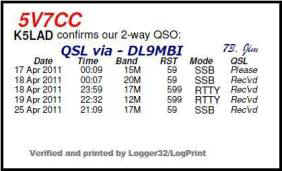
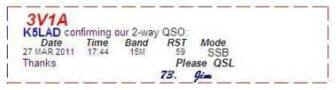
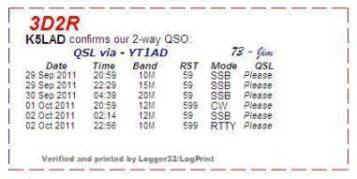
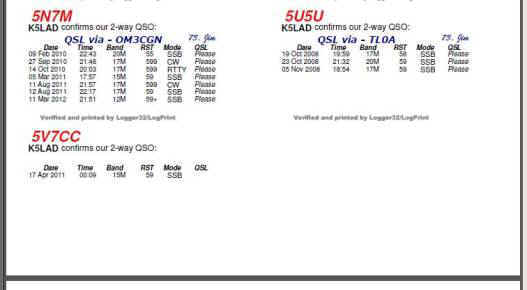
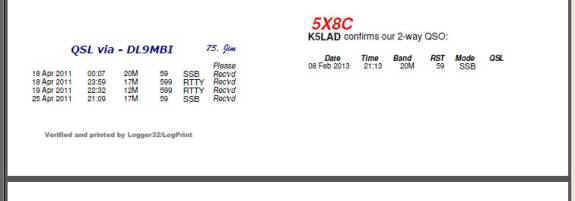
This article is an update for a previous article listed on my website and written back in 2007. That article, http://www.hayseed.net/~jpk5lad/LogPrint%20Labels/LogPrint.htm , titled ”LogPrint Multiple Label Suggestions” was quite well received and I found it referenced and recommended by numerous other website authors over the Internet. The original setup made no exceptions for multiple modes and/or verifying some contacts from cards the other station had already sent but requesting confirmation for other contacts with that same station. The new version listed in this article can print these mixed modes and mixed confirmations such as those shown below:
|
|
Under the
Mode column, it is possible to identify different modes. Under the QSL column you can see four items marked “Rec’vd” for several QSOs but a request “Please” for another contact. The previous setup article would find the first mode listed and first confirmation listed and duplicate it for every label entry. |
Each copy of LogPrint allows the user to have available three different setups for labels. The previous article referred to only the printing of a label with multiple QSOs whereas this article adds my setup information for printing all three: a smaller label for a single QSO confirmation, printing a full QSL card with ADIF data taken from the file created by Logger32 and inserted into the proper places on the card, as well as the modified setup for a label showing multiple QSOs with the same station. Note that the LogPrint Helpfile also has some setup examples to give you additional ideas.
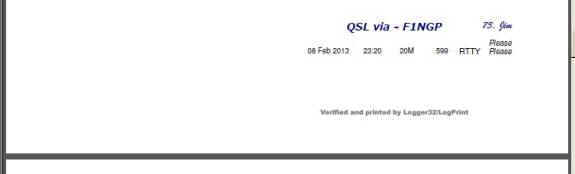
Although my original article did not show my setup for my
single QSO labels, I also modified my new option to add a “QSL via - ______”
line in the lower right corner of the label. The
logic for both label options is – if no QSL via or QSL manager is listed in my
Logger32 then none will be exported to the .adi file so nothing is printed in the
designated space for that information. Since
the ARRL Outgoing QSL Bureau wants you to send your cards to them sorted alphabetically by
the station who is to receive the card (whether it’s the actual station contacted or
their QSL Manager) it is especially handy to list that information on the label if
it’s available.
In addition to these, I have shown several of the error messages that a user might
encounter with LogPrint, what those errors mean, as well as a way to correct the setup
that has caused the error. This section may
be the best part; worth its weight in gold and may save the user much time and
frustration.
When this section was written, the current version of LogPrint was version 3.1.2. It’s possible that even this might be updated but the program is, at this time, a mature program and is quite complete in this current version. I would not hold my breath, waiting for an updated version. It reminds me of the old programmer’s adage which said, “A computer program is never finished…….. you just get tired of working on it.”
If you plan to use the features of this updated setup for LogPrint, it is advisable to go back to the original article and spend some time studying it. It goes into more detail about how the data values in the program’s setup affect the printed output. You need to understand this before using the modifications set forth in this update. As mentioned previously, it is located at http://www.hayseed.net/~jpk5lad/LogPrint%20Labels/LogPrint.htm
Updated article
information:
Some of the items mentioned here, such as setting up "Your Information" and choosing the printer will usually only need to be done once and will only need changing if it requires some modification. The values you choose and enter are saved to the LogPrint.ini file and are available each time the program is restarted.
The following is done to choose the printer to be used:
Check the pull-down menu from File and choose "Printer SetUp." The list of printers shown is taken from those already installed on your local Windows computer. If you are on a network and one or more network printers are installed, they will show up in this list also. Choose the printer you plan to use from the list of printers. If you do not currently have a printer available and just want to see what your LogPrint output looks like printed out as a PDF file, choose PDF995 from your list (see NOTE 1 below for instructions on locating and installing this program).
The following is done to set up your information to be
used:
Click on LogPrint "SetUp" and choose the top line, “Your Information”
Fill in the information requested, your call and the sharable part of your address you want to use. Note that there is not a box for a name, only call and addresses.
The following is done to choose which label or card printing to be used:
Click on LogPrint "SetUp" and choose the second group of lines down from the top:
Custom Label Design - DX QSLs 1
Custom Label Design - Multiple QSOs per label
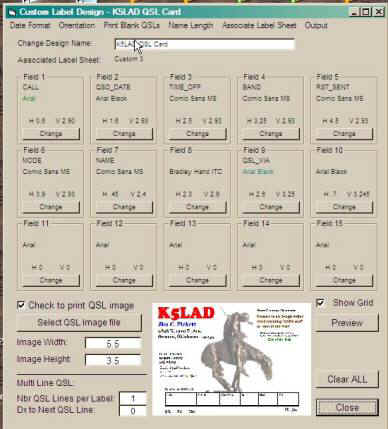
Custom Label Design - K5LAD QSL Card
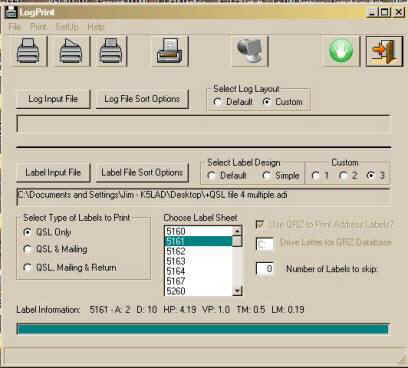
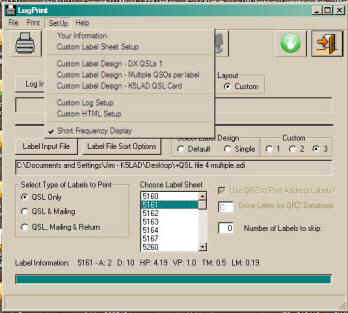
For #1 --- Custom Label Design – DX QSLs 1 |
|
|

a. Be sure you have filled out “Your Information” and have chosen a printer to use. LogPrint requires some sort of printer to be selected to run, even if it’s to be printed to a PDF file.
b. In the Box labeled "Choose Label Sheet" you can choose the product number for the Avery store-bought labels you planned to use. You can also define your own, referred to as Custom 1, Custom 2, or Custom 3. The Helpfile included with LogPrint fully explains the setup procedures for custom labels complete with pictures.
I was using Avery labels #5161 which is a 1” x 4" smaller label, which is a good label for QSL cards to a station with a single QSO to confirm.
Note: I notice, on my computer, that sometimes when I start the program from the beginning that the "Choose Label Sheet" window has moved from my previous setting to one of the Custom settings on the list. I've not determined exactly why but if your first preview of your labels does NOT look like you expected, perhaps displaying only one label on a page, you might recheck where this window's selection is set.
c. At this
point I have a bit of a problem and I’m working on finding a solution. When a logging program, such as Logger32, exports
the ADIF file to be used by LogPrint, it does so in the order in which it finds the QSOs
to be confirmed which is typically in chronological order or the order in which the
contacts were made. This mixes together the
entries for both single label and multiple QSO labels with less than desirable results. Using this file, if you had 1” x 4”
label stock loaded, the multiple QSO calls would span over two or more labels, even
attempting to print a line between labels. If
you had 2” x 4” label stock loaded, it would print the multiples OK but would
print a single QSO on a large label, which would be wasteful of the paper stock.
Somehow the exported file needs to be subdivided into
just those for single labels into one file and all the multiple QSO label entries into a
different .adi file. I am currently working
on several options to accomplish this including requesting someone to write another
standalone program where the user feeds in the whole exported .adi file and receives back
two separate files, one for singles and one for multiples.
At this time what I have been doing is to print my
multiple QSO labels (option 2) to a PDF file and visually identifying the single label
entries and manually pulling them from the total file and creating a separate file of just
singles. This file must be saved with an .adi
extension. What is then left in the larger file is just the multiple QSO entries and the
order they are in is unimportant since LogPrint will collect and sort the same calls all
together before printing.
I’ve also got some other ideas that I’m working on and will update this website article when a better solution becomes available.
c. UPDATE!!! Thanks to Marek – SP7DQR, there is now
a solution to the problem described above. Marek
has written a clever utility program called QSOs_select that allows a rapid division of an
.adi file. The user can create an ADIF file
for the paper QSLs they want to send; this is easily done from Logger32 or probably many
other logging programs and the ADIF file can be a mixture of calls for a single QSO or
multiple QSOs. This primary .adi file can be
in any order, i.e., if you have multiple QSOs from the same call they do NOT need to be
together in the file; Marek’s program can find them whatever their location and
output them together.
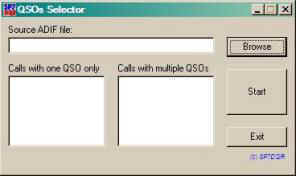
| As you start Marek’s program and it will display a box
labeled “Source ADIF file:” and a [Browse] box to let you search for your ADIF
file. The program is available by clicking here. |
|
|
 |
|
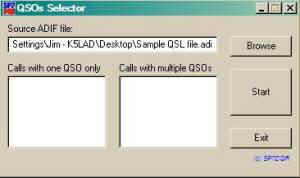
When you click on [Start], the program will find the .adi file and divide its contents into two files for use with LogPrint: one for Calls with one QSO only, and one for Calls with multiple QSOs.
|
Just as an aside, when I was manually dividing the original .adi file into two files, it took me more than 3 hours. Marek’s program does the same thing in less than 3 seconds, even for a large file. To see more information on the various programs Marek has made available, {see Note #4 below}.
d. Click on the rectangular box labeled [Label Input file] and browse for the .adi file containing the QSOs to be confirmed (see c. above). This file is the one created by your logging program, which will probably be Logger32. If you are using this single QSO setup with the smaller label stock and there are 3 separate QSOs in your file from the same station, it will print 3 separate labels to satisfy the data it finds, i.e. it does not combine multiple QSOs into a single label.
Note:
If you have multiple QSOs, i.e., multiple QSOs on different bands, with the same
station, you might want to consider using the second label setup option (Custom Label
Design - Multiple QSOs per label) to use only one QSL card and save some postage.
The following picture, on the left, shows the screen that displays when you’ve clicked on
" Custom Label Design - DX QSLs 1" On the right side is the left half of the preview for this setup. Only 10 of the 20 labels per sheet that print are show here to preserve space. Because the box labeled “Show Grid” is checked, you see the dashed lines around each label; the size is in accordance to the dimensions of the label stock you had previously chosen. The button under “Show Grid” will either show [Preview] to show the preview like on the right, or [Refresh] if the preview is already displayed as in the example.
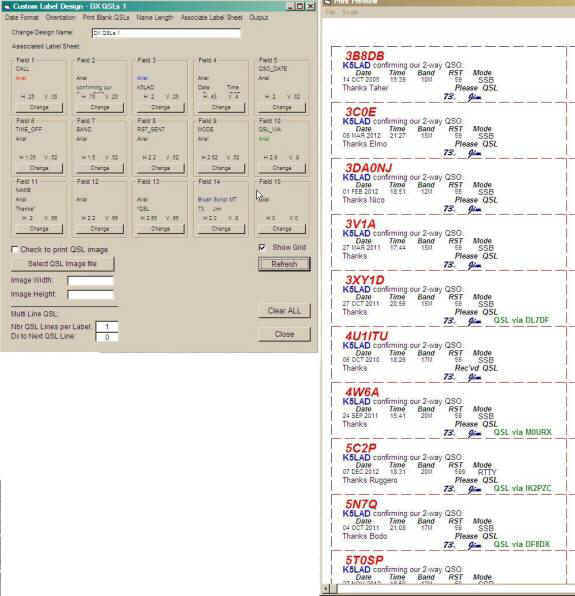
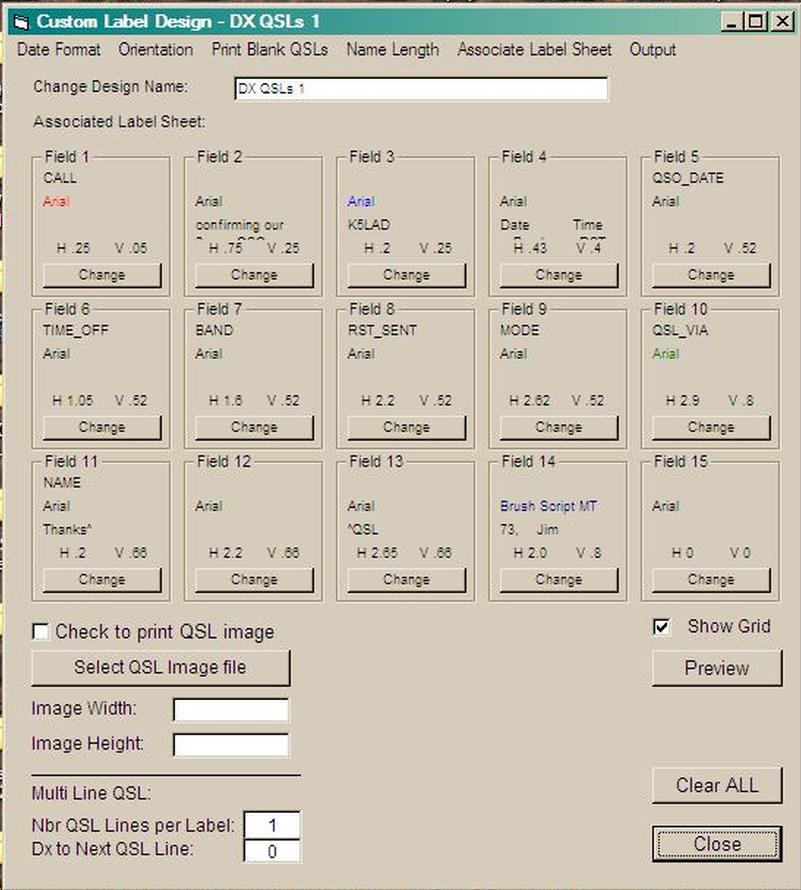
Click thumbnail for large setup screen. You should
be able to easily read the values from large picture.
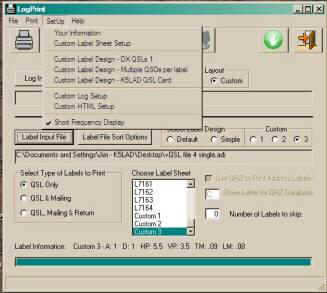
| For #2 --- Custom
Label Design - Multiple QSOs per label |
|
 |
a. Be sure you have filled out “Your Information” and have chosen a printer to use. LogPrint requires some sort of printer to be selected to run, even if it’s to be printed to a PDF file.
b. In the Box labeled "Choose Label Sheet" you can choose the number of Avery store-bought labels you planned to use or define your own as Custom 1, Custom 2, or Custom 3. The Helpfile included with LogPrint full explains the setup procedures for custom labels complete with pictures.
|
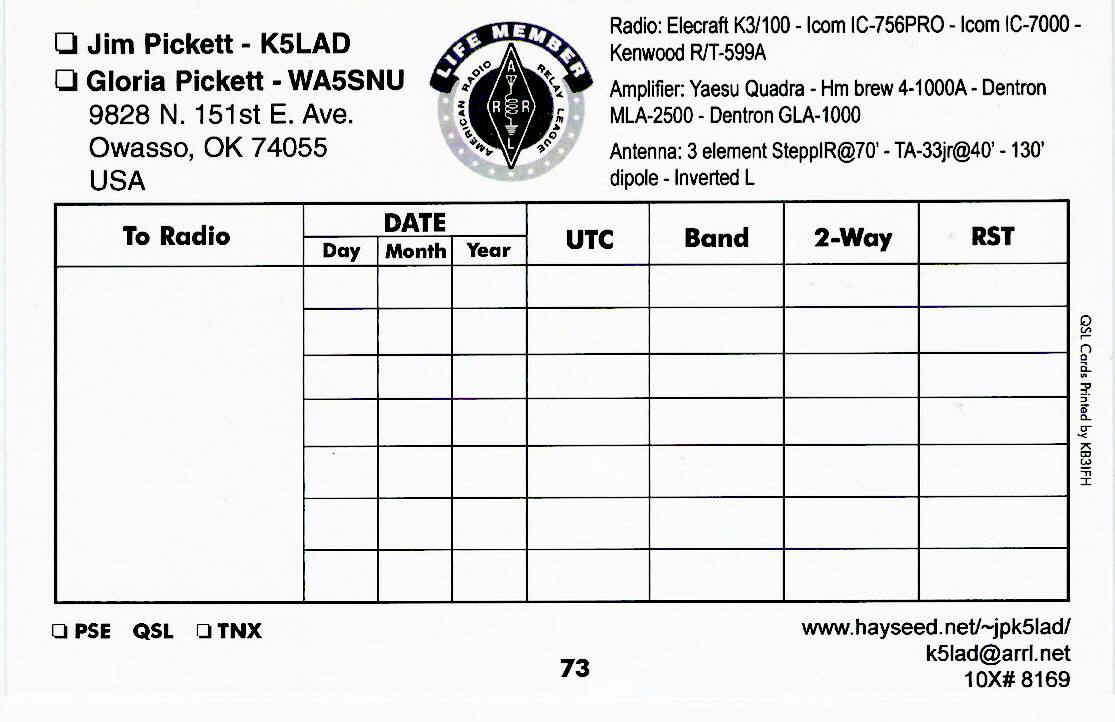
I was using Avery labels #5163 which is a 2" x 4" larger label, that is good for QSL cards to a station with multiple QSOs to confirm. It will print 10 multiple labels per page and each label can display from 1 to 8 QSOs. When I had my current QSL cards printed by KB3IFH, I had him create a 2” x 4” grid where I can manually insert from 1 to 7 QSO lines, if I’m filling out the card with a pen, or I can paste either sized label over the printed grid. The 2” x 4” multi-QSO labels described in option 2 fits neatly within the grid when I have the label printed on the computer as per this article. |
Note: I notice, on my computer, that often when I start the program from the beginning that the "Choose Label Sheet" window has moved from my previous setting to one of the Custom settings on the list. I've not determined exactly why but if your first preview of your labels does NOT look like you expected, perhaps displaying only one label on a page, you might recheck where this window's selection is set.
Somehow the exported file needs to be subdivided into
just those for single labels into one file and all the multiple QSO label entries into a
different .adi file. I am currently working
on several options to accomplish this including requesting someone to write another
standalone program where the user feeds in the whole exported .adi file and receives back
two separate files, one for singles and one for multiples.
At this time what I have been doing is printing multiple
QSO labels (option 2) to a PDF file and identifying the single label entries and manually
pulling them from the total file and creating a separate file of just singles. This file must be saved with an .adi extension.
What is then left in the larger file is just the multiple QSO entries and the order they
are in is unimportant since LogPrint will collect and sort the same calls all together
before printing.
I’ve also got some other ideas that I’m
working on and will update this website article when a better solution becomes available.
c. UPDATE!!! Thanks to Marek – SP7DQR, there is now
a solution to the problem described above. Marek
has written a clever utility program called QSOs_select that allows a rapid division of an
.adi file. The user can create an ADIF file
for the paper QSLs they want to send; this is easily done from Logger32 or probably many
other logging programs and the ADIF file can be a mixture of calls for a single QSO or
multiple QSOs. This primary .adi file can be
in any order, i.e., if you have multiple QSOs from the same call they do NOT need to be
together in the file; Marek’s program can find them whatever their location and
output them together.
| You start Marek’s program and it will display a box
labeled “Source ADIF file:” and a [Browse] box to let you search for your ADIF
file. The is the .adi file that can be
a mixture of confirmations of a single QSO with a station or may have multiple QSOs with
the same station. Merek's program is available by
clicking here. |
|
|
|
|
one for Calls with one QSO only, and one for Calls with multiple QSOs.
The two new programs will have the original name of the .adi file and 1QSO or original name and multi. Both new files will have the extension .adi, which is a requirement for LogPrint. |
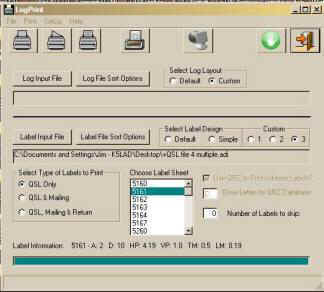
e. Notice that LogPrint allows you to print labels for: QSL Only, QSL & Mailing, or QSL, Mailing & Return. Again, the Helpfile is clear on why you might want to choose one of these options in preference to the others. I prefer to print my labels for QSL Only so under "Select Type of Labels to Print" I just choose "QSL Only" as shown in the example.
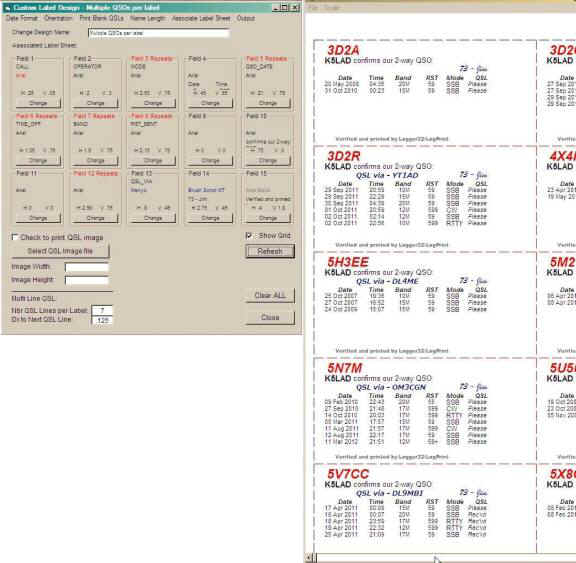
The following picture, on the left, shows the screen that displays when you’ve clicked on "Custom Label Design - Multiple QSOs per label" On the right side is the left half of the preview for this setup. Because the box labeled “Show Grid” is checked, you see the dashed lines around each label; the size is in accordance to the dimensions of the label stock you had previously chosen. The button under “Show Grid” will either show [Preview] to show the preview like on the right, or [Refresh] if the preview is already displayed as in the example. Note that when you click on Preview, depending on the size of your .adi file and the speed of your computer, it might take quite a while, even several minutes. to display the preview results. During this time, LogPrint is reading all the entries in the .adi file, sorting, then collecting the entries for each separate call sign together. ----------------------------------------------------------------------------------------------
Click thumbnail for large setup screen. You should be able to easily read the values from large picture. |
|
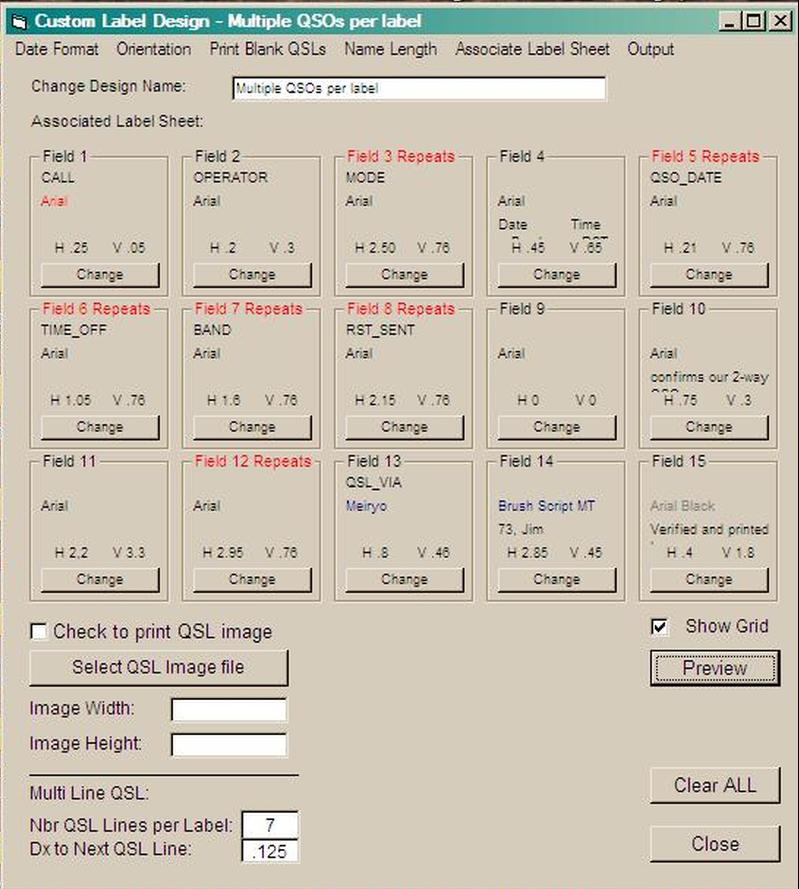
The box to the left of "Check to print QSL image" should not be checked since you're not trying to print a picture on your label. I like to check the "Show Grid" to allow me to see the boundary lines showing each of my labels when I have clicked the Preview box to see what they will look like when printed. The grid here is never actually printed by the printer.
===============================================================
| For
#3 --- |
 |
b. In the Box labeled "Choose Label Sheet" you can choose Custom 1, Custom 2, or Custom 3 to define the size of the card you will use for your QSL card. For mine, I chose to use Custom 3.
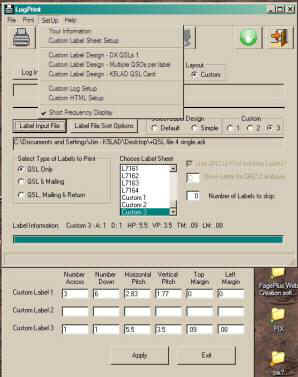
c. Click on the SetUp word at the top of the sub-window and choose "Custom Label Sheet Setup" From the picture you can see how I set up my Custom Label 3 to print a QSL card. When complete, click on [Apply] to write this information to the LogPrint.ini file.
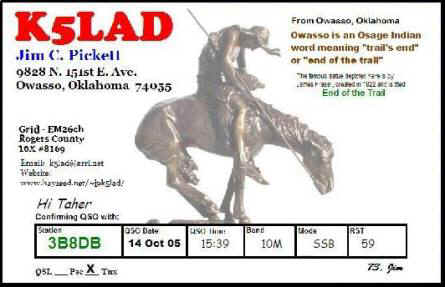
d. Now you can click on SetUp, then click on "Custom Label Design - K5LAD QSL Card" (or whatever name you have designated for this option). Use the QSL card template you created {see NOTE #2}. The print QSL image referred to on the setup sub-window is actually your QSL card template. It includes the picture, if one is included, your call and personal information and any other writing you want printed, and the boxes to fill in the QSO data. Even if you do not have an actual picture on your card template as I have, the QSL card template itself is a picture so be sure to check the box for “Check to print QSL image.” Note that the Image Width (5.5) and Image Height (3.5) is the same size as the finished QSL card since the template picture prints all over the full card dimensions.
I like to check the "Show Grid" to allow me to see the boundary lines of the completed QSL card when I have clicked the [Preview] box to see what it will look like when printed. The grid lines are never actually printed by the printer.
f. When the QSL card is set up like you want it and the Preview looks like what you had planned, click on the [Close] box to return to the first screen.
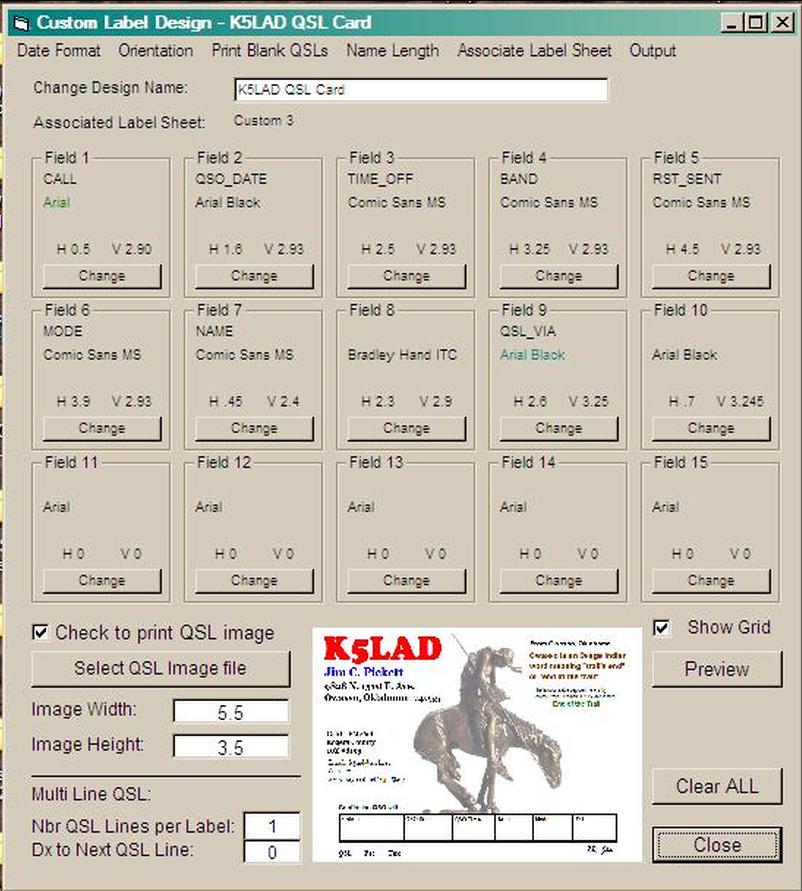
Click thumbnail for large setup screen. You should
be able to easily read the values from large picture.
g. Click on "Print" to get the drop-down choices and for this activity; you'll want to click on the 4th choice, "Print QSL Label" even though you might not consider the card as a label. The label designation is still the closest to the QSL card printing, according to LogPrint's options. The other three choices above it are for printing your logbook, either fully or partially.
h. QSL card printing using this method is slow and requires close attention to the task but printing this way may be used primarily for creating just a few cards at a time. If you desire to print a fairly large number of cards at one time, the options for printing single or multiple QSO labels might be preferable.
===============================================================
Note #1 – If you do not have a printer available or you don’t want to use up your label stock or heavy card stock for QSL, consider a program which announces itself like a printer but prints, instead, to a PDF file, readable by Adobe Reader XI (available free at
http://get.adobe.com/reader/?promoid=JZEFU)
Install a program called PDF995 to have this available. You can find it at http://www.pdf995.com/. It is a free program but the non-registered version has quite a few advertisements as it runs. For a small fee (currently $9.95) you can get a key to eliminate the sponsored advertisements.
Note #2 - The template for your QSL card can be as simple or as complex as you like it. There are free programs available on the Internet that allow you to add your own information while it arranges it in the proper places for you. I would recommend that you spend an hour or two looking over QSL cards shown on the Internet or if you have already received QSL cards from others, look them over to get ideas of what you would like. It is easier to create your own template if you spend some time seeing how others have made their cards, either created by themselves or by commercial QSL printers.
For my template, I used the simple Microsoft Paint program that has been included in Windows packages for many years, perhaps from back to the first Windows OS package delivered. It is simple to use, freely available, and provides a good finished product. I am far from a creative artist but I think mine looks pretty nice.
Note: You can also print copies of your QSL card template and create blank cards to manually fill in the boxes for a single, quickly required card. This is done by displaying the QSL card setup screen (option 3 on my examples) and choosing the selection message under the title bar that says “Print Blank QSLs”. More detailed instructions are given for this activity in the Helpfile.
The small utility program Marek has written for use with LogPrint here is available by clicking here. When time allows, Marek with integrate the features of this program into his currently available program called ADIF_FILTER. This program allows the user to take an ADIF file created by a logging program such as Logger32 and specifically pull out just the pieces of information desired for a particular project. You should take a look at this program as it is a very handy tool to have in your toolbox.
If you would like to see or have a copy of the LogPrint.ini used for this article click here to download. It has all the setup information for:
Printing single
QSO labels
Printing
multiple QSOs labels
Printing full QSL card with QSO data
===============================================================
ERROR Messages in LogPrint v.3.1.2
-----------------------------------------------------------------------------------------------------------
When Field9Condition=|notEqual|Rcv'd|Please|
I got a Runtime Error 383. I deleted the "not" to just leave "Equal" and still got the error. I deleted the "Rcv'd" and "Please" and the error went away. Note: the error can occur on any of the 15 fields but in this case it was in the data I had in Field 9 of a label setup.
On Field9Condition=|notEqual||| --- I got the error
On Field9Condition=|Equal||| --- I did NOT get the error
Conclusion - Runtime 383 Error is caused by an inappropriate setting in the Field#Condition setting.
Field9Condition=|Equal|||
When a Field is removed from usage, it is vital that it be removed correctly and thoroughly. You cannot just remove the vertical and horizontal positions, the
ADIF fields to choose for decisions and the ADIF field information to print ---
you MUST click on the button labeled [Clear ALL] which returns the
"Fields#Condition" entry to that shown above, i.e., Field9Condition=|Equal|||
===============================================================
ERROR 2 - Runtime 481 Error - Invalid picture
This error occurs when the Setup routine expects to find a picture to use in a QSL or SWL card print but the picture cannot be found
BMP {bitmap} files are generally several times larger than JPG files in number of bytes. These larger files should be better resolution over the JPG but my old non-artist eye cannot see any difference.
===============================================================
ERROR 3 - QSL via printing on wrong label
My QSL via - (call) entry kept printing on the wrong label, (it printed below on the next sequence of labels) particularly when the printing location was near the bottom of the label (above the "Verified and Printed by Logger32/LogPrint" line). After much work and changes, I determined that it worked correctly when called upon to print above the logbook entries closer to the top of the label.
ERROR 4 - Preview and/or printout only shows a single label on the page instead of the full page of labels as expected.
I noted previously in the article, that occasionally I’ve discovered, on my computer, that sometimes when I start the program from the beginning that the "Choose Label Sheet" window has moved from my previous setting to one of the Custom settings lines on the list. An example might be: you originally had the "Choose Label Sheet" highlighted on #5161 because you wanted to print 20 – 1” x 4” labels per sheet but when you look at the preview or the printed copy, only one label appears on that page or some strange configuration appears other than what you wanted.
Go back and look at your "Choose Label Sheet" and make sure it is still on the highlighted line - #5161.
Conclusion - The solution is to reset the "Choose Label Sheet" to what you need.
======================================================================
ERROR 5 - Runtime 380 Error
- Invalid property value
When I discover a solution to this one, I’ll add it to the website.
===============================================================
ERROR 6 - Printing one page of labels that span several pages. Incorrect paging of printed pages
One of the problems I ran into came a couple of years after I had successfully used the setup described in the original website article. After making the changes for the improved Multiple QSOs Labels, when I tried to print them on the label stock or to the PDF file I got disastrous results.
When printing either single QSO {option #1} or multiple QSO labels on Avery #5163 (2" x 4") label stock {option #2}, it would print the first 8 labels per page correctly (or 18 labels with option 1). The picture below shows what should have been the last 4 labels at the bottom of the page where 10 labels were to be printed per page. The bottom two labels of every full page was like this.
------------------------------------------------------------------------------------
IF - QSL_RCVD
IS - Equal
TO - Y
THEN - Rec'vd^
ELSE - Please
Horizontal - 2.2 Vertical - 3.3
Current font is Arial at 10 pts.
------------------------------------------------------------------------------------
Once I clicked on [Clear ALL], all the values were removed
and the skipping pages and labels problem was gone.
Something quite small can cause you major problems. I guess you could say that the moral to this story
is, Don’t overlook the obvious.
As you work with LogPrint and become more comfortable with it, my recommendation to you would be, once you have a version working correctly and printing, at least partially like you want it to print, SAVE a copy of that working LogPrint.ini file in a separate folder and write yourself a text message that “this one is working.” When LogPrint crashes with an error message it will often shut down completely and it is hard, if not nearly impossible, to get past the error message to correct the error. You must do your correcting within the .ini file to get past that error. Being able to go back to a known working LogPrint.ini file will keep the frustration factor down to a MUCH lower level and, perhaps help extend your life for several days longer.
; printer paper over the floor (No, no this is not a true error, just an example of a REMark)
Field14FontSize=12
; the information
printed on this part of Field 14 will be 12 point size
Field14FontBold=True ; the information printed on this
part of Field 14 will be bolded
Also, if you’re having a problem with some area and you suspect a line in the .ini file is causing you the problem, you can REM that line (or several lines) out by placing a semi-colon in front of the suspect line. LogPrint will then not read or execute the line but you will be able to find the EXACT wording and location to put it back, just by locating and removing the semi-colon/s.
There have been times I have worked with the LogPrint program and been able to create a label or card looking exactly as I had pictured it; the operation went as smoothly as silk. There are other times when I have spent many hours fighting with a misprinting problem, or even worse, with an error message that was unclear and might as well have been written in hieroglyphics. I hope that some of the ideas given in this new article, and particularly a clearer description of the error messages, will allow you to create some very nice pieces of work.
Note: Both the Logger32 complete logging program and the LogPrint printing program are available for FREE downloading from the website at:
Logger32 can be found by choosing Program Files and LogPrint is under the choice Support Files.
Written March 27, 2013 Updated 03/28/13 09:19 PM