How can I power this thing up?
Adding a
12 volt DC power cable for the Yaesu FT-736R transceiver
By Jim Pickett – K5LAD
I bought my FT-736R VHF/UHF transceiver from a seller on
ebay and I’ve been quite pleased with it, thus far.
For a radio designed back in the latter part of the 1980’s, it has a lot of
features that were only available to later versions of ham equipment.
My transceiver was complete and worked well but as I read
through the literature on the Internet, one point kept surfacing which worried me a bit. It had to do with the built-in AC to DC power
supply in the unit. The standard Yaesu
FT-736R is set up to run on 117 volt AC using an internal power supply and generates 12
volts DC. The output from this internal supply exits the cabinet at the rear and
plugs back in to a 6 pin Molex socket to feed the DC back into the radio to provide
necessary power. If the user prefers to run
their transceiver on a DC supply they can unplug this internal power lead and plug in a
power cable connected to an external 12 volt DC supply.
All too many times I read about people needing information
on repairing their power supply and comments about adding a fan or some other addition to
help the power supply because it ran too hot. Several
other folks were talking about how they had bought a “spare” power supply for
insurance against their FT-736R transceiver being left without a good AC/DC internal
supply. Suddenly I was faced with a possible
dilemma. Although the power supply in my
unit was fine and worked perfectly, should I take a chance that mine would continue
working well or be proactive and do something before I had a possible problem? Not being much of a gambler and also because
I had numerous places, in my shack, to pick up the 12 volts DC to run the rig that way, I
decided that I’d run my 736 on externally available power and save the internal
supply on an “as needed” basis.
When I bought my 736 it came with several accessories such
as the tone board and the CW filter to accompany the standard 2 meter and 70 cm converters
but there was no DC power cable. I even had
both the Operator’s Manual and the Service Manual so I should be able to build one
from information found there. Neither manual
had that information available.
Since the Internet is the source of almost any bit of
information you could ever want or need, then surely I could find the pin location on that
Molex DC input socket on the back. Search as
I might, however, I was unable to find it. There
were numerous sources of schematics for the 736 and many even had the power supply, rather
they had part of the power supply. For
some reason, the part showing the AC and DC input was missing.
Obviously, then, my Plan B was to examine the radio and determine which pins needed which polarity for the 12 volt DC supply. Also I needed to see if there were any extra switching tricks connected to and through that socket.
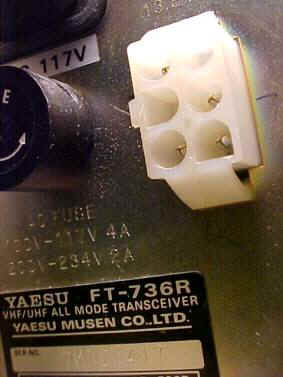
First, by looking at the plug that brings the DC from the
internal power supply, it was obvious that only four of the six connections were used, at
least for the 12 volt DC input. The plug
looks like this:

This was confirmed by checking the socket on the back of the transceiver:
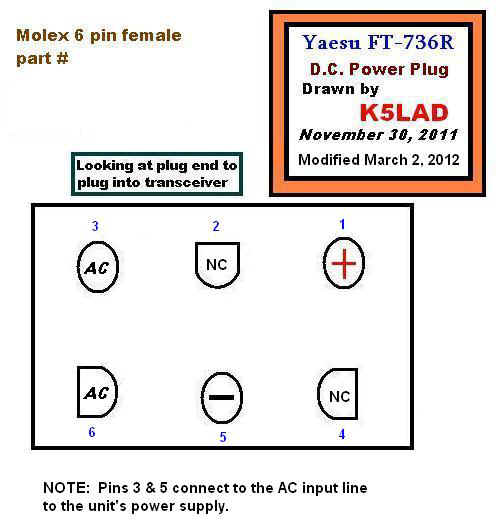
It was obvious that two of the connections would be for +12 volt and – 12 volts but I still needed to track down those other two. Doing some more checking, I determined which of the 4 of 6 pins were for the DC power and I marked the back of the transceiver so I could remember and know, next time, without spending a bunch of time trying to find my notes.
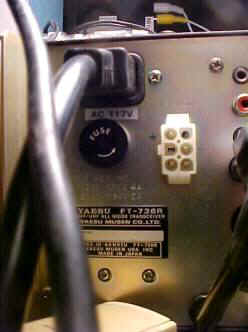
I later determined that the two pins, on the bottom row of the Molex connector, were for AC input. In other words, 117 volts AC could be normally be connected to the transceiver through the standard 3 pin socket marked AC 117V located just above the fuse holder on the rear apron. AC could also be connected to the radio via those two bottom pins on the DC cable. For what I wanted to do, I could totally ignore those two bottom connections.
I found one of the proper 6 pin Molex plugs from among my
junk box treasures, built a DC power cable and terminated the other end in an Anderson
PowerPole connection. I have, on the wall
behind my ham equipment, a RigRunner 4012 power distribution strip with 12 PowerPole
connections, all fused with individual fuses of assorted values. I’m using a connection fused at 10 amps for my 736R's DC power
cable.
The cable worked perfectly and I continue to use it this way. It’s very possible that the internal power supply in my transceiver is perfect with none of the flaws I had read about from others. Running my FT-736R on an external 12 volt DC supply just gives me one less thing to worry about. In addition to that, if there was ever a problem where I might lose AC power for a long period of time (like the winter of 2009), I should be all set to continue my operation with battery power.
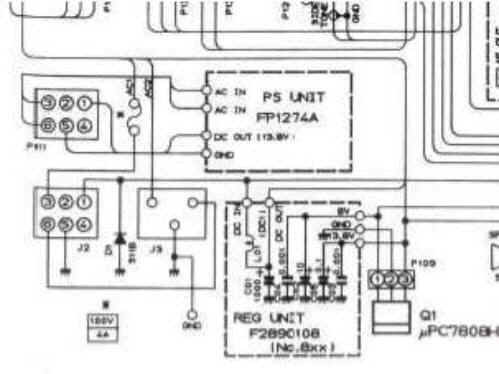
Oddly enough, after I had spent all of my efforts and time
to figure out the pinout on the Molex plug/socket, I discovered a schematic that actually
showed the AC and DC power input. Numerous
other schematics that I was able to find had been fairly complete but ignored the power
input section, which, of course, is what I needed and wanted. I cut out just that part and reproduce it here
below:
Jim - K5LAD
Created
April 4, 2012