K5LAD - 50+ Years of Ham Radio Memories
Volume XXXVI
The Lofty Lookie
By Jim Pickett – K5LAD
Search keywords: Towercam, Tower Camera, Tower Cam
If you’ve got a tower or even a simple tall pipe for your antenna, you can fix up a means to observe your neighborhood for weather, security, or just to see what that terrible noise is outside your hamshack. The thought of adding a TV camera on your tower might seem to be an expensive addition and far beyond your meager ham accessory budget but the truth is, with a little work and imagination you can add this handy feature to your ham station for less than $50. I’m not talking about a camera with multiple lenses and zooming capabilities nor a camera that can pan up and down to follow a rising balloon, but if you already have a beam on a mast turned by a rotator, you already have the means to allow you a 360 degree TV sweep of your neighborhood.
The
name for this article is “The Lofty Lookie.”
That name comes from a ham friend of mine from the 1970s, Warren Weldon –
W5DFU (SK) and this article is dedicated to his memory.
Warren was a most quiet and unassuming man who worked for many years for American
Airlines and lived on Reservoir Hill in north Tulsa, also for many years. Warren was one of the most intelligent and
creative hams I ever met and created quite a number of devices to make his life better. He told me that once he went to a local overhead
garage door company to buy a device to raise two doors simultaneously. They told him that no such device existed and
probably would not work. Not to be halted,
Warren went back home; devised and built exactly what he needed. The company, later, learned of his creation and
after coming to his house to see it, paid him for his idea and made it a part of their
offering for others.
Warren
also had built a really nice TV camera, which lived at the top of his ham tower and looked
out over the city of Tulsa. His camera did
have zooming and full panning capabilities as well as a small windshield wiper to keep it
going during rainy weather. Even some of the
variable adjustments were remotely controlled by selsyns located inside his house. He even had an infrared camera tube for his camera
and sometimes he would haul the camera down, insert the IR tube in the camera, and view
the heat patterns for the city of Tulsa. He
also made provisions to transmit the images from his home (using the regular video tube)
of weather observations to the local Weather Bureau during storm season. Warren was a master creator of electronic and
mechanical projects and “The Lofty Lookie” was one of his favorites.
The
TV system I propose is nowhere nearly as elaborate as Warren’s system but for all it
does, for such a small amount of money, it is a worthwhile ham project. You may even want to purchase several cameras, run
them through an inexpensive Radio Shack Audio/Video switch, and cover an even larger area
of your property: tower, front door, garage,
etc.
The
camera is the most costly of the pieces needed but, even then, it isn’t really that
much for what it does. It is available from
Harbor Freight, either from their website or at a local store. The camera is described as a “Color Security
System Camera” --- Item number #91851 and the list price is $40 to $50. Interestingly enough, this is one of the items
that Harbor Freight places on sale every few months so if you aren’t in too big a
hurry, you can save some money. The camera is
not a wireless model but comes with 80 feet of cable, which should be enough for many
setups. My tower is 69 feet high and is
right outside of my shack. The camera mounts
at about the 70- foot level and looks out over my 3-element SteppIR beam. It might seem like the 80’ cable might be
just a bit too short of this but it comes down the tower and enters the attic at about
15’ above the ground and down into the shack with several feet of cable to spare.
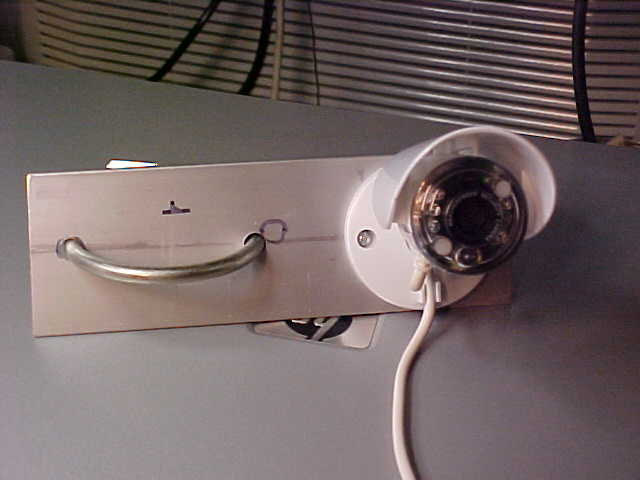
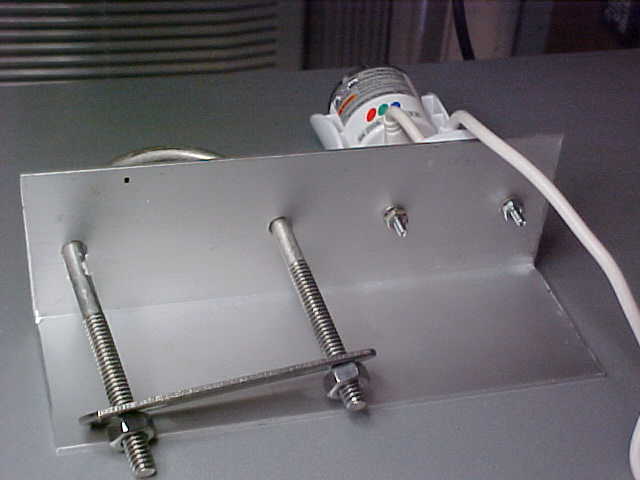
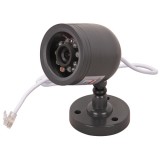
In addition to the color picture it provides, the camera has a built-in microphone to listen to sounds if you want to hear that too. This camera also has a circle of IR LEDs around the lens which would illuminate a garage area if it was being used as a nighttime security camera, however, the IR lighting is pretty insignificant on a |
|
The camera and cable on the mounting bracket |
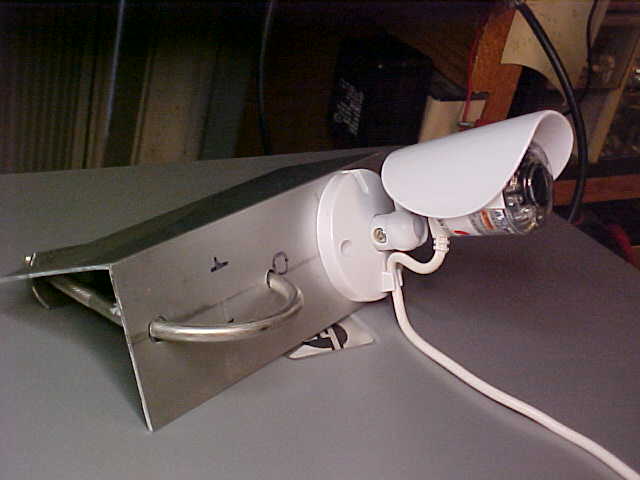
tower
camera installation. If you happen to be
watching the screen at night and a bird flew by in front of the camera, you would, no
doubt be able to see it flash by. I have seen
birds roosting on my beam element like this and during the hot part of the day in early
spring, the wasps like to investigate the camera and create an almost Mothra monster image
when they are directly in front of the lens………….. a rather frightening
sight.
One
disadvantage of the newer Harbor Freight cameras is the lack of an IR filter over the
lens. Earlier cameras they sold had this
filter and you could hold it and view the lens a bit sideways and see a rose or
pinkish-colored hew on the lens. With the
filter, the outdoor colors are brilliant, vibrant, and true but without the filter,
particularly when the sun is out brightly, the IR rays of the sun make green items viewed
look white, including the trees and the grass. The
temperature may be 110 degrees outside and it looks like the trees and ground are covered
with snow. I have H.F. cameras both with and
without the filters and the only way you can tell them apart (without plugging them into
something to view their video signal) is to look for that IR filter.
Several
of us have asked for the IR filter to be brought back, and perhaps someday they will, but
the newer ones, so far, are lacking the filter. I
have attempted to find a small IR camera filter to mount in front of the camera lens, or
even to find a piece of a broken IR filter to adapt, but I’ve not been able to, so
far. The actual lens opening on the camera,
is less than ½” so it wouldn’t take too much of the IR filter material to do
the job.
When
the sun is less bright, the lack of an IR filter problem is not so great. The camera has remarkably good low-light
capabilities and can continue to offer a good image even some time after sundown. Once I turned my camera to an area of town about 2
miles away from me where a nighttime grass fire was being fought. Even after the flames had died down, and were no
longer evident, I could see the flashing red lights from the fire trucks at the scene
against the black screen.
To
view the video and also hear the audio, if desired, you have two, single RCA phone plugs
on the shack end, that can easily plug into a TV, a VCR or DVD unit with A/V inputs or it
can work well into a small 7” LCD TV with A/V inputs if they are available. The camera is powered by a simple 9 volt wall wart
that plugs into a coaxial power socket by the audio and video cables on the shack end of
the 80’ cable.
|
|
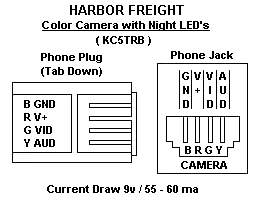
In
addition to the 80’ cable, the camera has about a 2’ cable down to a 4 pin RJ-11
socket. The top end of the 80’ cable
terminates in an RJ-11 plug. Thanks to Harry
– KC5TRB here’s a drawing of the four pins used on the 80’ cable. Note: the 4-wire cable carries the audio, the
video, and +9 volt power plus the ground return for all. |
The
camera weighs only a few ounces and can be mounted in numerous ways depending on how the
user’s tower or mast top is set up. My
tower has a 2” rotating aluminum mast so I choose to make a simple bracket for the
camera to clamp onto that mast. My hope was
to have a bracket that could be easily and quickly mounted, or if a problem developed, it
could be quickly and easily removed. Since
I’m at the mercy of my tower-climbing friends, I want it to be as easy for them as
possible. I believe this bracket accomplishes
that requirement.
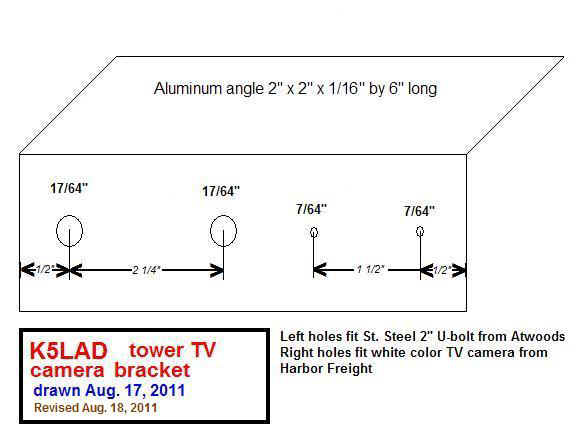
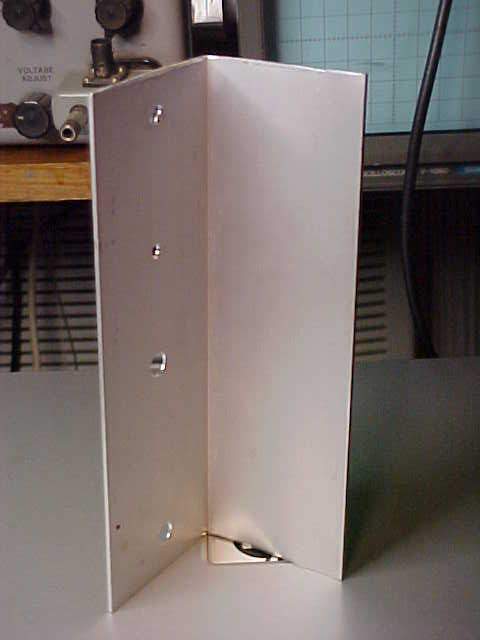
For
the bracket I used a 6” piece of 2” x 2” x 1/16” aluminum angle stock
--- the type that is usually available at the big box hardware stores. Only one side of the angle is used for mounting
but the other part provides additional strength plus it provides a weather shield for the
RJ-11 connection plug and socket. Since my
mast is 2” OD, the U-bolt was chosen to fit that dimension and I was able to find a
stainless steel U-bolt at Atwood’s, a local farm equipment supply store. Your choice of a U-bolt should be according to the
size mast or tube you will be using and there is a great range of mast sizes used in ham
radio applications. Be careful of the
distance between holes for the U-bolt since the holes are wider apart than the inner space
in the U-bolt. Here’s a drawing of the
drill pattern I used for my bracket.
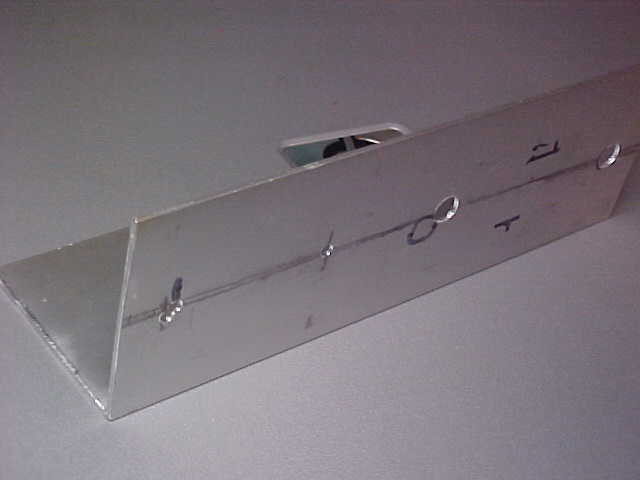
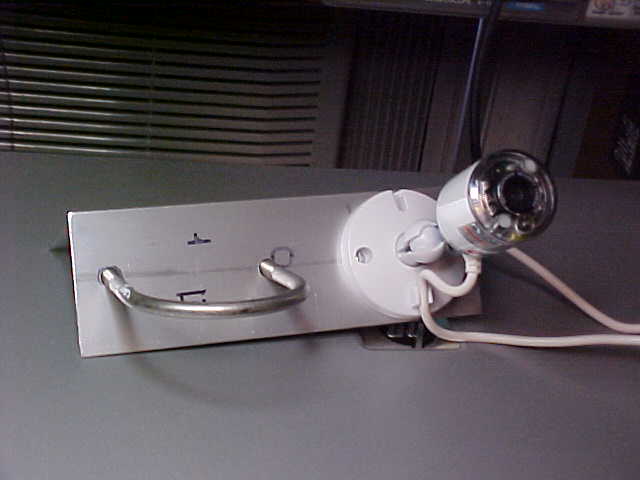
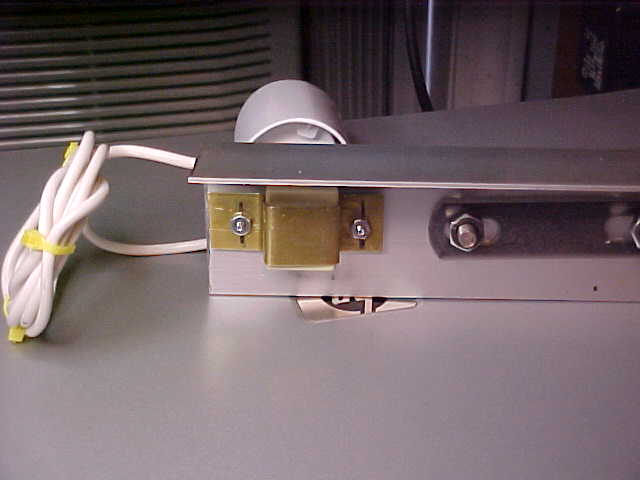
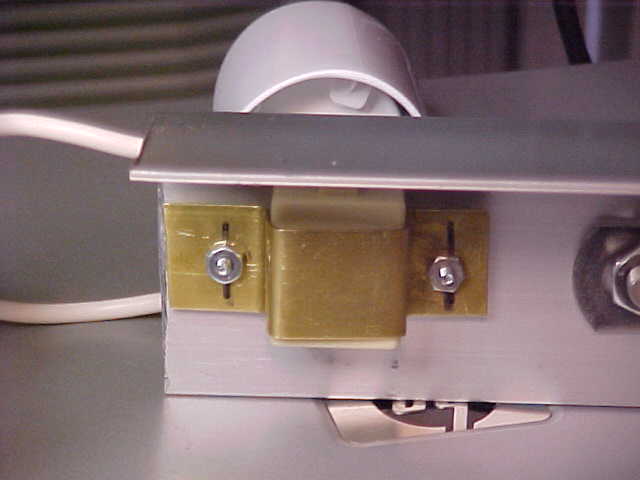
Here
follows several pictures of the bracket I built. These
are provided only for some suggestions since every builder will see a different way to
mount their camera. You can, no doubt, see
ways to improve my work but this should provide “seed thought” for the project. There are some extraneous marks on the bracket
pictures; I like to call those my “thinking marks.” You might also see one of the drilled holes for
the camera looks like oo where the hole was drilled in the wrong spot. I call that my “Oooops” hole.
|
|
|
|
|
|
|
|
|
|
|

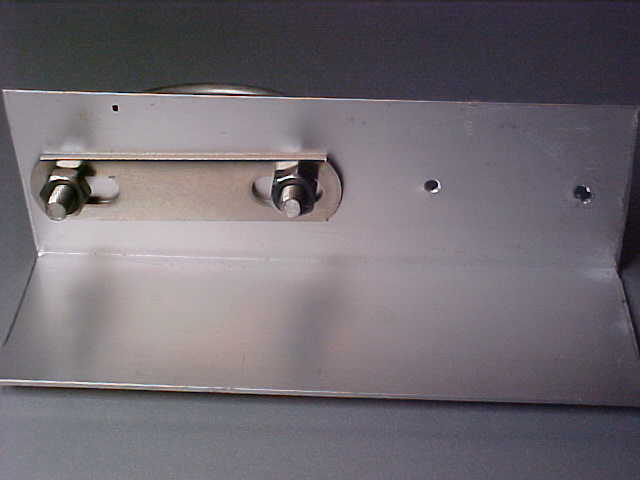
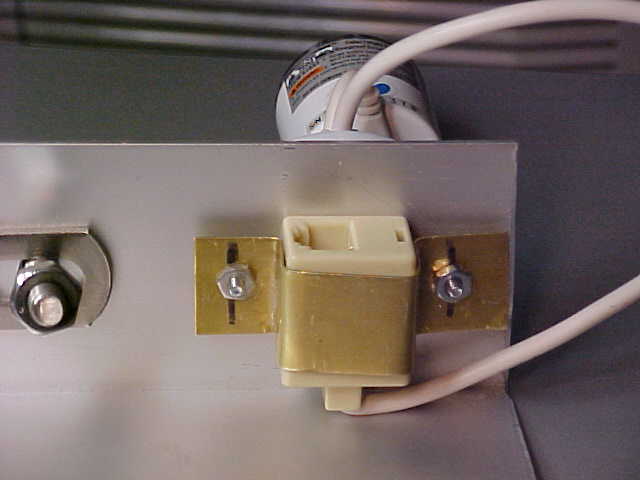
The
RJ-11 socket from the camera is friction-mounted on the backside of the screws holding the
camera. Mounted here it gains the benefit of
the horizontal piece of the angle as a weather-protected shield. One note here is, the camera is held to the
bracket by 2 - 4/40 x ¾” screws, 2 - internal tooth lock washers, and 2 - nuts. The brass strap that holds the RJ-11 socket goes
atop those 2 nuts and mounts to those 2 screws with two more nuts. That way, if someone was up on the tower checking
for a problem with the TV system, they could remove the brass strap but not have to fumble
with a loose camera if a screw was dropped. The
camera remains firmly mounted, even with the brass strap removed. The brass strap was purchased several years ago at
the “Hobby Center” display at a local Ace Hardware store. They may still have them or you could check at a
Hobby Shop type business. Failing all of
those places, a pair of old scissors and an aluminum Coke pop can might provided the
needed resource for the strap.
After
I finished this article I did some checking on the Harbor Freight website http://www.harborfreight.com and they seemed to
have changed their offerings on the TV cameras. The
one mentioned now on their pages is #95914 with a list price of $59.99 and a current sale
price of $34.94.
|
The
new model looks a good deal like the original model shown in the article above but does
not have the extra ‘umbrella’ plastic piece as a cover on top. The advertising information still says this one is
weatherproof. It also seems to have the short
cable that runs from the camera to the RJ-11 plug. Those
who purchase this model should check the mounting holes as there may be some variation
over the ones I used. I
do not know whether the new version, shown here, has the IR filter. |
I
also should mention that the tower camera, although physically located very close to my
antenna, does not suffer from RFI when transmitting, even using a KW. I do get some tearing of the video picture when
using my Inverted-L antenna on 160 meters and it is further away from the camera. Suffice it to say that the camera is
relatively clean with respect to RF signals.
Once you have been able to bring a rotatable TV signal into your hamshack from the top of your tower, you might even consider one of the available webcam-type programs to share your “Lofty Lookie” pictures on the Internet. To lift one line by Humphrey Bogart in the 1942 classic movie – Casablanca, “Here’s looking at you kid.”
Last edited - 05/09/2013
Page visited 636 times![]() Return to the Home Page
Return to the Home Page